

An appointment reminder is a good test of whether a contact center can do more than react. When a work order is scheduled, Power Automate can send the appointment type and date to Dynamics 365 Contact Center, which places an outbound call and starts a Copilot Studio voice agent with that context already available. This is great for when you want to confirm the appointment with the customer 24 hours before. They can either tell the bot they confirm the appointment or say that no longer works and be directly escalated to a customer service agent or dispatch manager in Contact Center to reschedule their appointment.
The call is the easy part. The detail that makes the scenario useful is passing data through the whole chain without losing it: from the work order, into the proactive-delivery request, through the workstream, and into Copilot Studio global variables. Those variables can drive the wording of the call and the branches that follow it.
The flow of data
Scheduled work order
        |
        v
Power Automate cloud flow
        |
        |  CCaaS_CreateProactiveVoiceDelivery
        |  InputAttributes: appttype, apptdate
        v
Dynamics 365 Contact Center proactive engagement
        |
        v
Outbound workstream context variables
        |
        v
Copilot Studio global variables
        |
        v
Personalized voice message and conditional logic
The variable names are the contract between every stage. If one layer calls a field apptDate and another uses apptdate, the agent will not receive the expected value.
What needs to be in place first
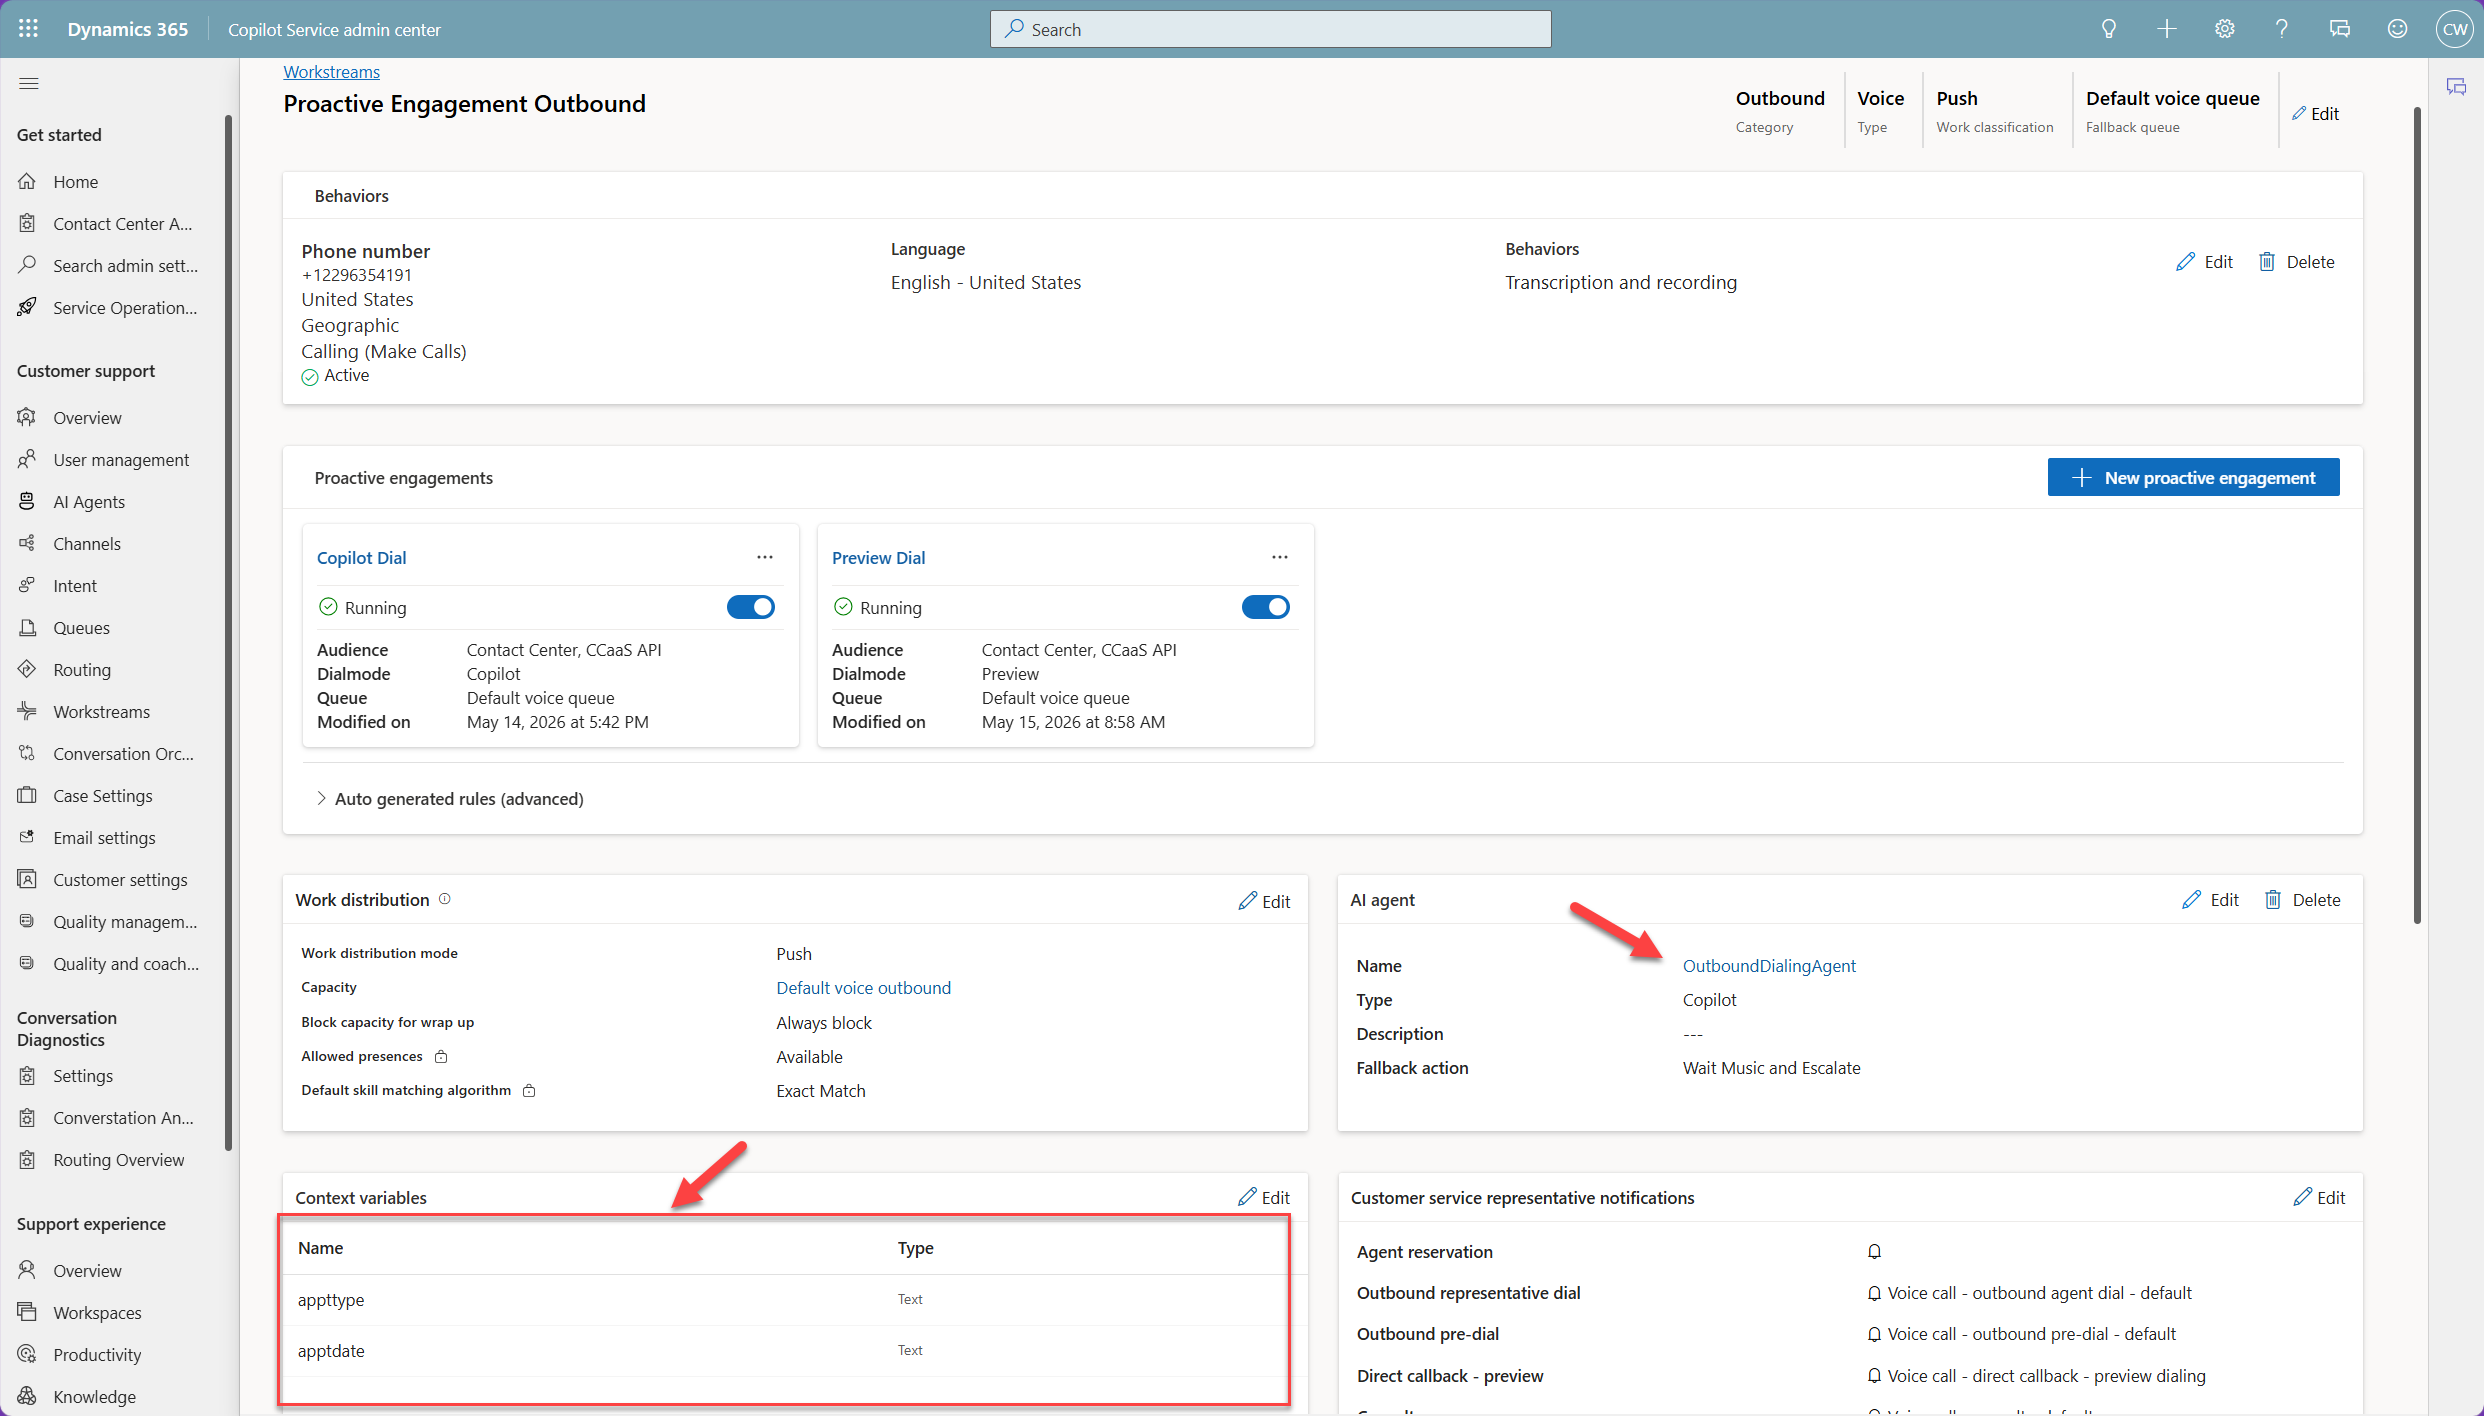
Before building the flow, configure an outbound voice workstream and an AI-led proactive engagement in Copilot Service admin center. For this pattern, select Contact Center as the audience, use the CCaaS API intake method, and choose Copilot as the dialing mode. Copilot dialing starts the outbound call and connects the customer to the AI agent when they answer.
The workstream in this example is an outbound voice workstream with Push work distribution and an attached Copilot agent. The proactive engagement configuration tells Contact Center which workstream, dialing mode, and outbound profile to use.
You also need a Dynamics 365 contact record and a destination phone number in E.164 format, such as +12304327897. The API uses the contact GUID as ContactId, while the destination number is the number that is actually dialed.
Proactive calling needs more than a working API call. Make sure your organization has consent to call the recipient, respects quiet hours and any do-not-call process, and uses the appropriate calling windows for the scenario.
Create the workstream context variables
On the outbound workstream, add a context variable for each value that will arrive in the call. This example uses two Text variables:
| Context variable | Type | Purpose |
|---|---|---|
appttype |
Text | Describes the scheduled service or appointment. |
apptdate |
Text | Holds the customer-friendly appointment date and time. |
These context variables are the workstream-side landing points for the data in InputAttributes.
Keep the names short and consistent. appttype has to be spelled the same way in the Power Automate JSON, the workstream context variable, and the Copilot Studio global variable. Treat the casing as part of the contract too, even if a particular test environment appears forgiving.
Trigger the flow when the work order is scheduled
Use a Dataverse trigger against the Work Order table, then add a condition that matches your organization’s definition of “scheduled.” Some teams use a change to the system status. Others use a scheduling-specific field or a booking event. The important part is that the flow does not call customers on every work-order update.
Before the proactive-delivery action, collect four values from the work order and its related records:
- the Contact GUID for
ContactId - the normalized phone number for
DestinationPhoneNumber - a service or appointment description for
appttype - a formatted date and time for
apptdate
Format the appointment time for a customer, not for Dataverse. September 10 at 9:30 AM is more useful to a voice agent than a raw UTC timestamp. If the work order only stores UTC, convert it to the customer’s intended time zone before you build the attribute.
Call the proactive voice delivery action
Add Microsoft Dataverse – Perform an unbound action and select CCaaS_CreateProactiveVoiceDelivery. The screenshot below is the setup to mirror. The key fields are numbered so you can compare your flow quickly.
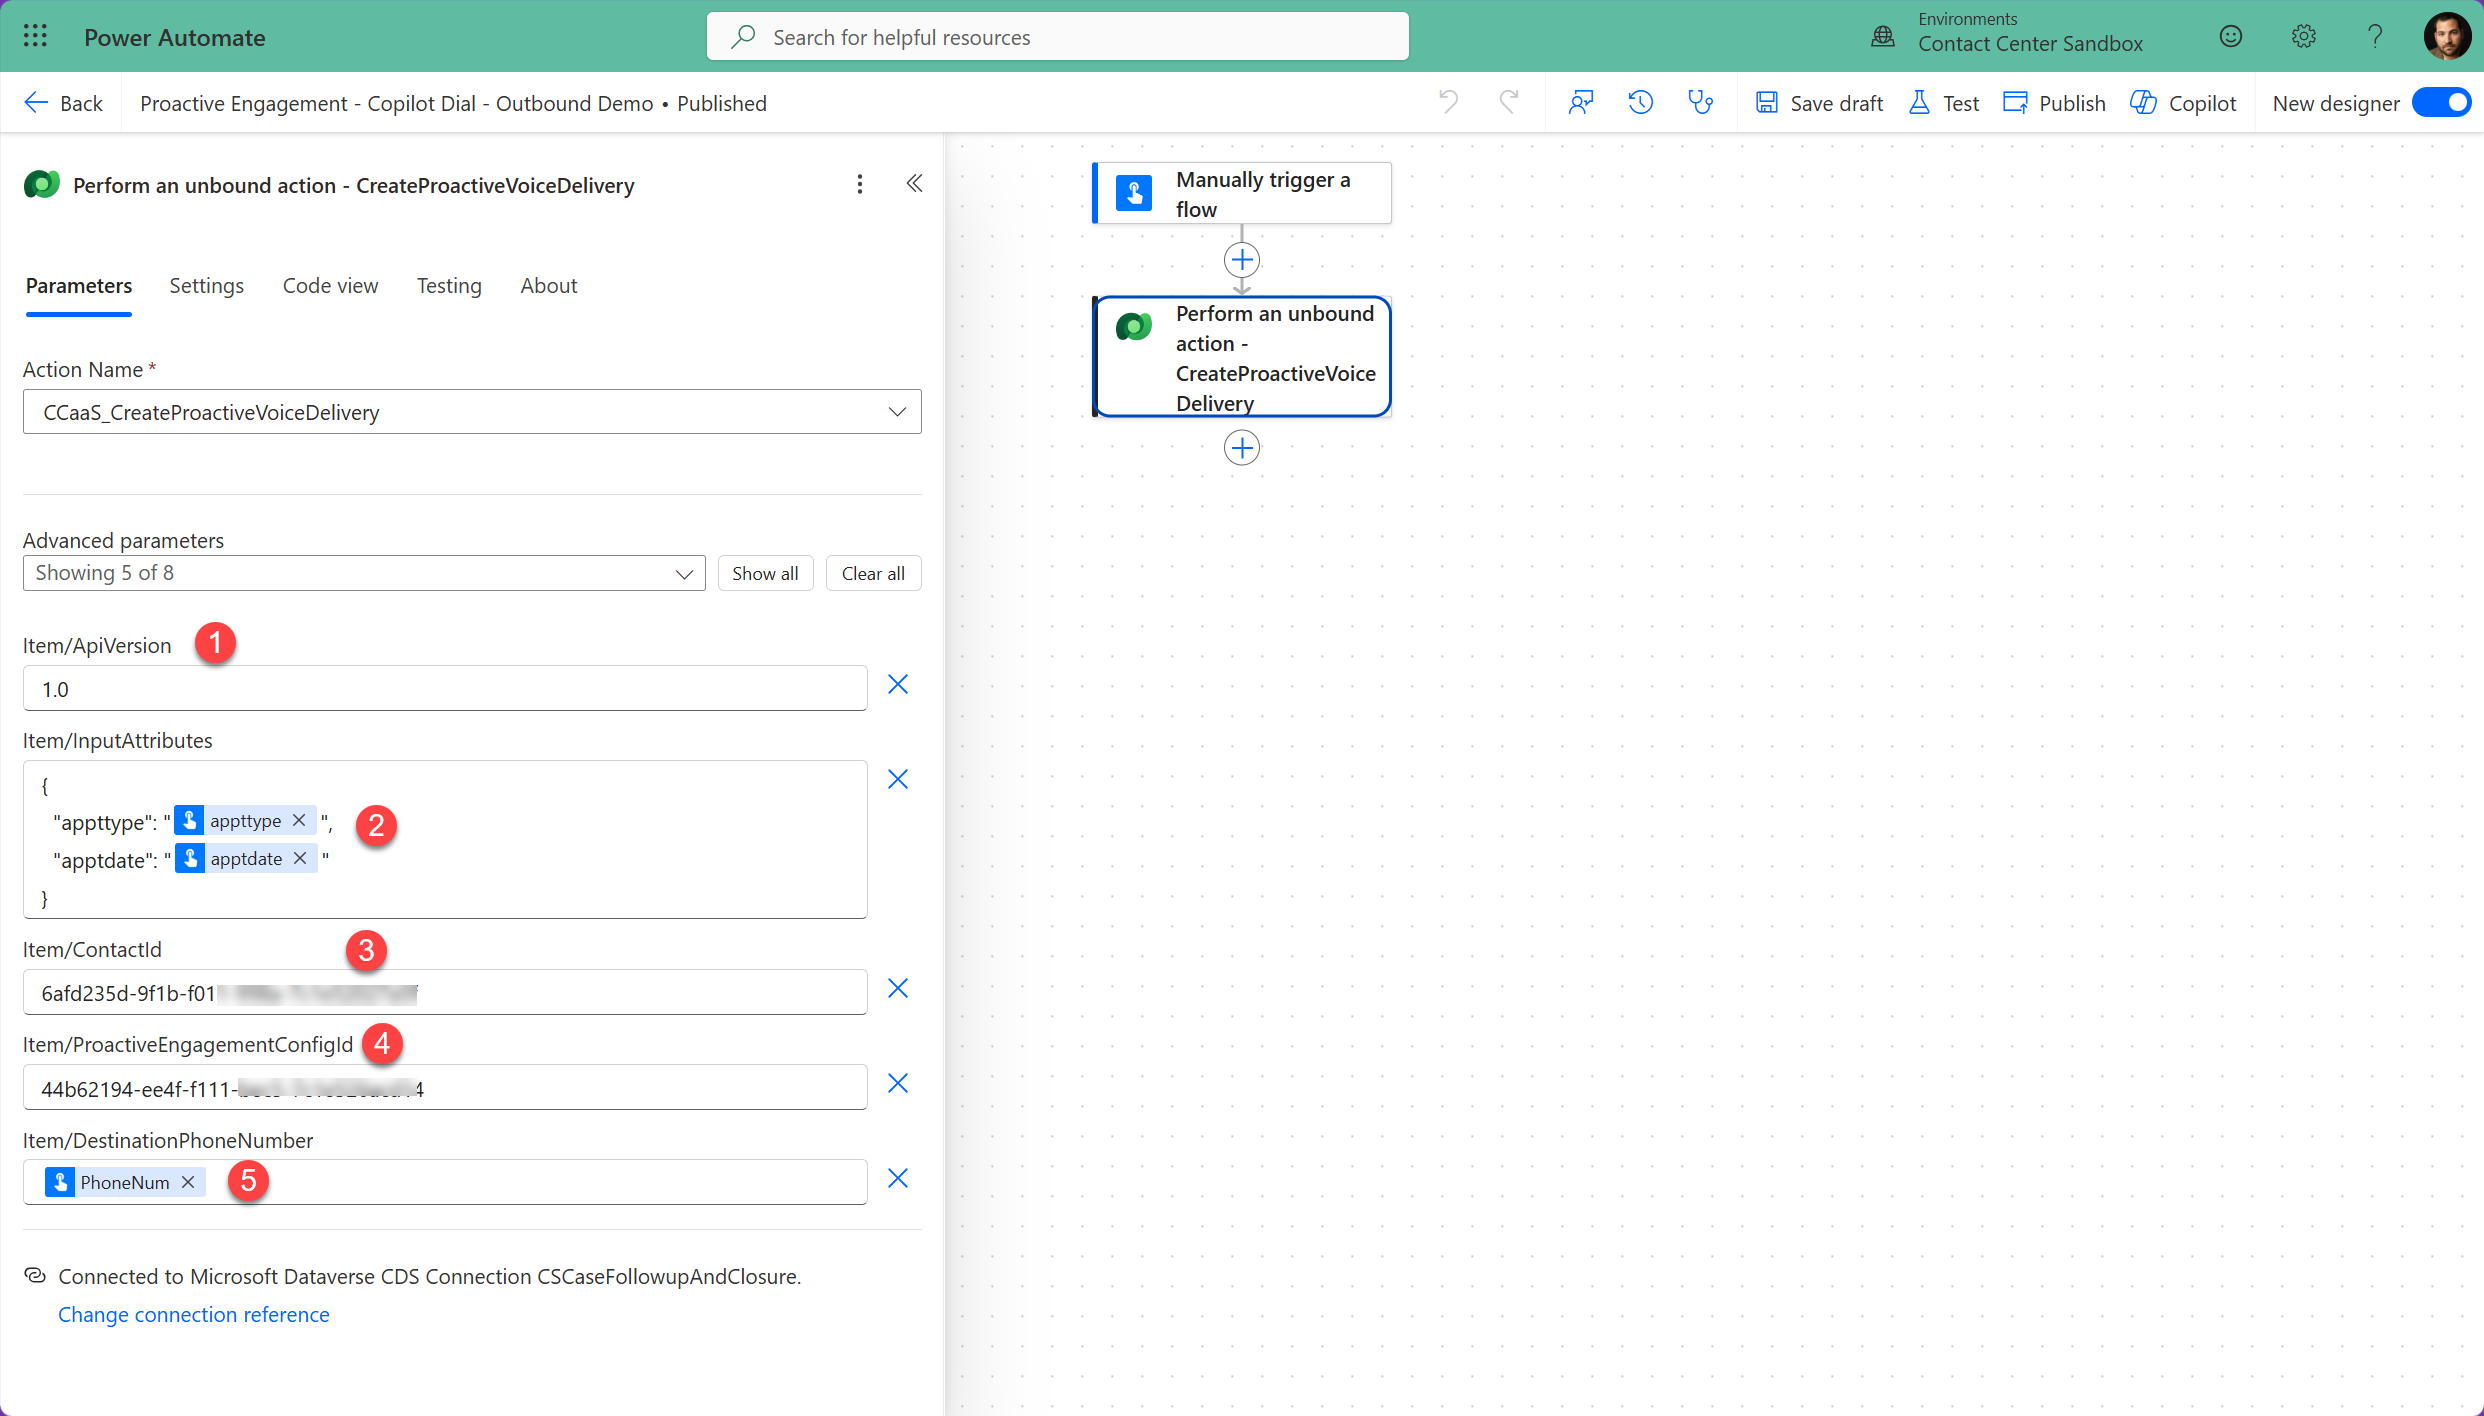
Set the fields as follows:
- ApiVersion: Set this to
1.0. It is required. - InputAttributes: Send valid JSON using the same keys as the workstream context variables.
- ContactId: Pass the GUID of the Dataverse contact.
- ProactiveEngagementConfigId: Pass the GUID of the proactive engagement configuration.
- DestinationPhoneNumber: Pass the target number in E.164 format.
The API accepts InputAttributes as a JSON object containing key-value strings. In the Power Automate designer, the action can render this as a JSON text field. The following shape matches the configuration in the screenshot; insert dynamic content for the two values rather than hard-coding the sample text.
{
  "appttype": "HVAC service call",
  "apptdate": "September 10 at 9:30 AM"
}
If you build the JSON in a Compose action instead, validate the output before you pass it to the Dataverse action. Quotes in a dynamic value, an unescaped line break, or an empty token can turn an otherwise valid payload into malformed JSON.
A request accepted by the API returns a DeliveryId. Store it in the flow run history or write it back to the work order. It gives you a direct link between the business event and the proactive delivery record when you need to troubleshoot a missed call or an unexpected outcome.
Initialize the Copilot Studio variables correctly
Creating context variables on the workstream is only half of the mapping. The agent also needs global variables that external sources are allowed to populate.
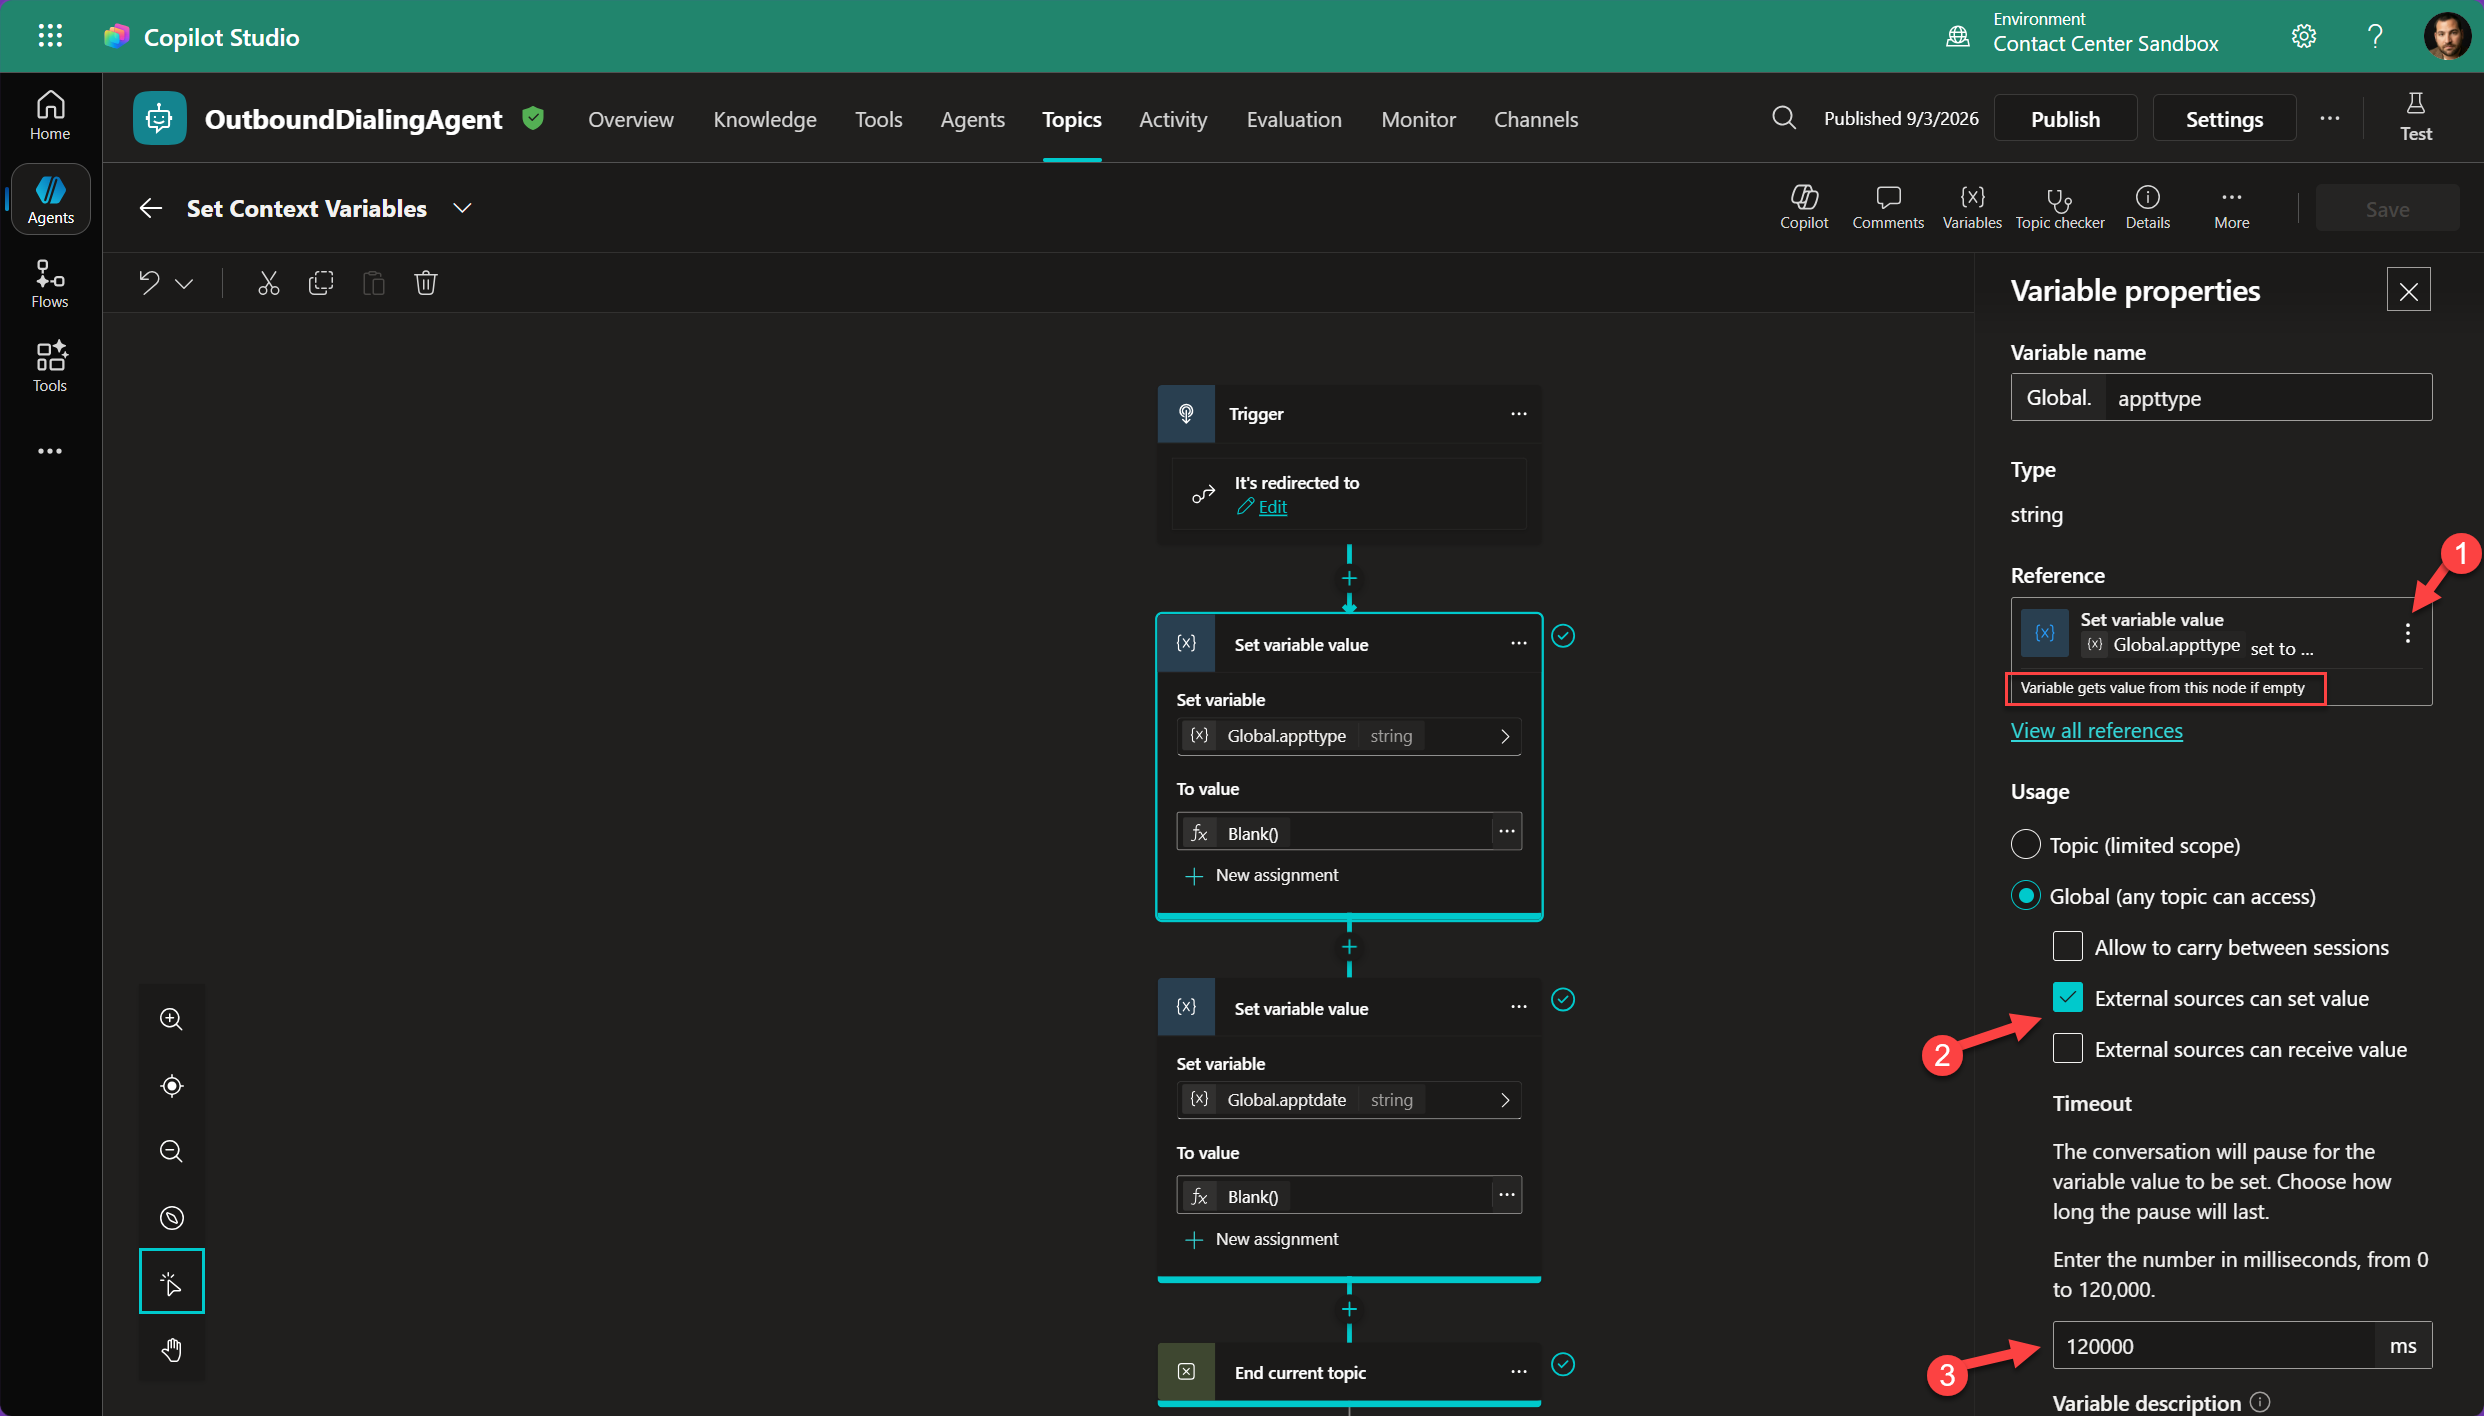
Create Global.appttype and Global.apptdate in Copilot Studio as string variables. For each variable:
- Set Usage to Global (any topic can access).
- Click the ellipses in the reference box and change it to Variable gets value from this node if empty
- Turn on External sources can set value.
- Add a Set variable value node as the variable’s reference.
- Set the node’s value to
Blank(). - Confirm the reference says the variable gets its value from that node if empty.
The screenshot shows both global variables initialized in a small setup topic. The reference waits for the external value, and the example timeout is set to 120,000 milliseconds.
Do not use a placeholder such as "unknown" or "not set" as the initial value. The external-source mapping only applies when the variable is empty. A placeholder makes the variable non-empty before Contact Center supplies the value, so the injected attribute never replaces it.
Blank() looks like a small detail, but it is the difference between a personalized call and an agent that keeps reading the default text.
Also avoid using an empty Question node to receive the values. A voice agent expects a Question node to prompt the caller and receive speech or DTMF input. For proactive context, use Set variable value nodes and let the external attributes populate the global variables.
Use the data in the outbound voice conversation
Once the initialization topic has populated the globals, any topic can reference them. A message can say:
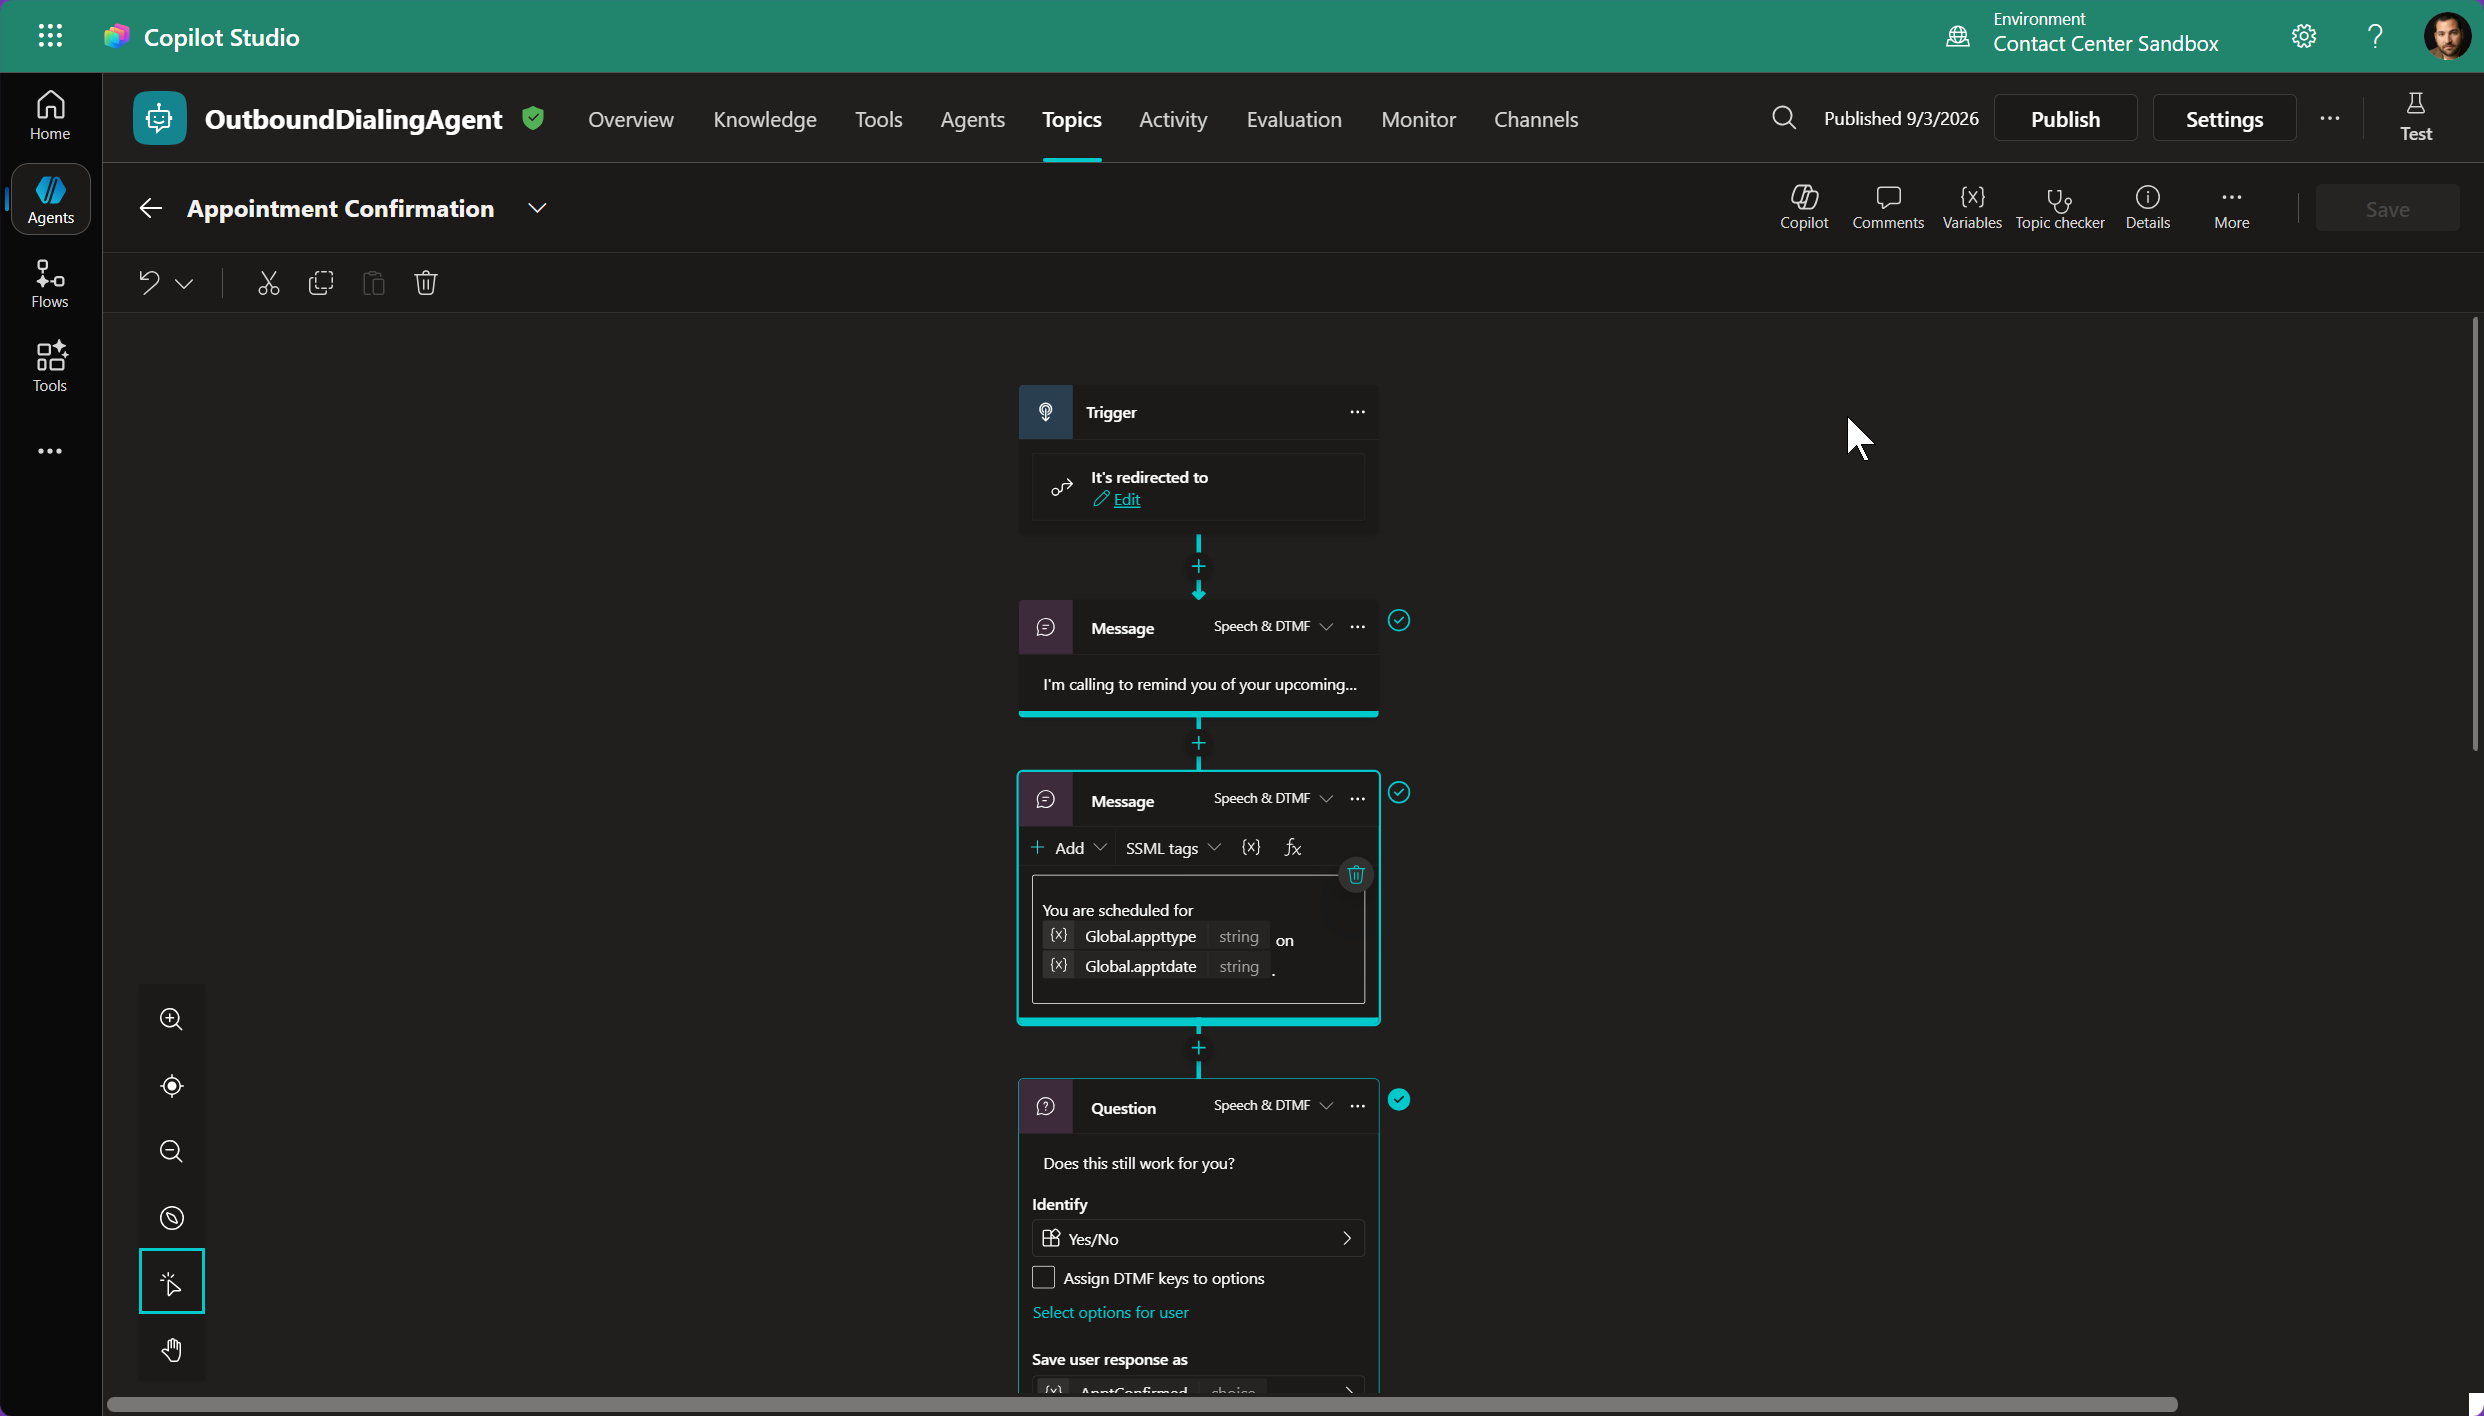
You are scheduled for {Global.appttype} on {Global.apptdate}.The appointment-confirmation topic in the screenshot inserts both variables into the voice message, then asks the customer whether the appointment still works. The same data can drive conditional branches. For example, an agent could use a different opening or escalation path when Global.appttype identifies a repair, a maintenance visit, or an installation.
Publish the agent after changing the topics or variable properties. The workstream can point to the right agent while the live version still lacks the changes you tested in the authoring canvas.
Troubleshooting the mapping
When the call connects but the agent says blank values, check the chain in this order:
- Is the Power Automate action sending valid JSON in
InputAttributes? - Do the JSON keys exactly match the workstream context-variable names?
- Do the Copilot global variable names exactly match those keys?
- Are the Copilot variables global and enabled for external sources?
- Are the variables initialized with
Blank()and referenced from the setup nodes? - Has the agent been published since the variable changes?
For an API error about a missing parameter, check ApiVersion first. For a generic voice-topic error, remove any empty Question nodes that were being used as context receivers and replace them with the variable setup shown above.
Where to go next
This pattern works for more than appointment reminders. A scheduled work order can pass the work-order number, service address, technician window, language preference, or a link key for a follow-up process. Start with two fields and a simple confirmation topic. Once that is reliable, add the branching and handoff paths that fit the service operation.
For the current API details and proactive-engagement configuration options, see Microsoft’s documentation:
- Configure proactive engagement in Dynamics 365 Contact Center
- Use CCaaS_CreateProactiveVoiceDelivery API
For more practical Dynamics 365, Power Platform, and Copilot Studio guidance, browse the D365 Videos blog.